Fix/Repair "Manage" From Right Click Menu of "Computer" in Windows 7

On some Windows 7 systems when you right click on "Computer" in the start menu and then click "Manage" you would get an error, or "Manage" wouldn't open at all.

This little reg tweak will fix it and have "Manage" From the right click menu working again :-)

Windows Registry Editor Version 5.00

[HKEY_CLASSES_ROOT\CLSID\{20D04FE0-3AEA-1069-A2D8-08002B30309D}\shell\Manage\command]
@=hex(2):6d,00,6d,00,63,00,2e,00,65,00,78,00,65,00,20,00,63,00,6f,00,6d,00,70,\
00,6d,00,67,00,6d,00,74,00,2e,00,6d,00,73,00,63,00,00,00
 

Enjoy!
-Shane


Disable Pop up's from Avira AntiVir Personal - Free Antivirus

I no longer use Avira since they have sold out and now want you to install the Ask toolbar and won't take no for an answer. For my customers I now install
Avast Antivirus
www.avast.com

Avira is currently the antivirus I put on all of my customers systems and my own.
I based what antivirus to use for my customers on a few things.

1. Must be free
2. Must not put a performance hit on the system.
3. Must be good at finding viruses.


Avira does something that backfires. They include a giant pop up box asking the user to upgrade to the pro version.

Now Avira only does this once a day. The draw back? Numerous customers thought it was an infection or spam!
They are so use to seeing giant pop up's as being bad that they got angry that I put a antivirus on there that was doing it. Even though I told them it only happens once a day they didn't care.

So the fix? To block that pop up. And believe it or not most of my customers have bought the pro version because they liked how good the free version was. And this is with the pop ups blocked :-)

So the trick is in the Windows Registry. I have also attached a reg file to this page that you can download.

Windows Registry Editor Version 5.00

[HKEY_LOCAL_MACHINE\SOFTWARE\Policies\Microsoft\Windows\safer\codeidentifiers\0\Paths\{12af7d6a-aeed-4c09-a5c7-dd1f0e3fb07d}]
"LastModified"=hex(b):fc,5e,32,3c,e3,3b,ca,01
"Description"=""
"SaferFlags"=dword:00000000
"ItemData"="C:\\Program Files\\Avira\\AntiVir Desktop\\avnotify.exe"

[HKEY_CURRENT_USER\Software\Microsoft\Windows\CurrentVersion\Group Policy Objects\{AC9646BD-FD7E-4EE0-99E5-78A91B114A5B}Machine\Software\Policies\Microsoft\Windows\Safer\CodeIdentifiers\0\Paths\{12af7d6a-aeed-4c09-a5c7-dd1f0e3fb07d}]
"LastModified"=hex(b):fc,5e,32,3c,e3,3b,ca,01
"Description"=""
"SaferFlags"=dword:00000000
"ItemData"="C:\\Program Files\\Avira\\AntiVir Desktop\\avnotify.exe"
 

What we are doing is telling windows not to allow the Avira pop up exe to run. Keep in mind the malwarebytes program flags it as a bad reg key. This is because normally users dont block exe's from running. So it flags anything as it. You can just add that key to its ignore list :-)

I hope in the future Avira will redo their pop up. And instead of a spam looking window they can just have something in their program itself as its running a scan or something.

Enjoy!
-Shane


Keep Terminal Services & Remote Desktop From Disconnecting

I have run into many cases where my customers had a hard time with a remote desktop connection to their server disconnecting.
I did all the tweaks needed to make sure terminal services and remote desktop (They are the same) didn't have a timeout limit.
So why on earth was their connections still dropping?

Well after doing some research the problem is the connection being dropped by the isp or router. When a port is in use but no traffic is going across it the connection is dropped after a while.
The fix? To have the remote connection send a keep alive, or heart beat packet.

Now the remote desktop will send data to keep the connection alive. And so far, every customer who had disconnect problems has been fixed :-)

I applied this registry tweak to the server the users where connecting to.

Windows Registry Editor Version 5.00

[HKEY_LOCAL_MACHINE\SYSTEM\CurrentControlSet\Services\Tcpip\Parameters]
"TcpMaxDataRetransmissions"=dword:00000010

[HKEY_LOCAL_MACHINE\SYSTEM\CurrentControlSet\Control\Terminal Server]
"KeepAliveEnable"=dword:00000001

Enjoy!
-Shane


Screenshots - Belkin - F6D6230-4 v1 (Belkin Firmware)

Screenshots - Belkin -F5D9012 v1 (Belkin Firmware)

Screenshots - Belkin - F5D8232-4 v2 (Belkin Firmware)

Screenshots - Asus - RT-N10 (Asus Firmware)

Screenshots - Airlive - WN-5000R (Airlive Firmware)

How to test if your router supports Reverse NAT

How to test if your router supports Reverse NAT.
By Shane C. of PcWinTech.com


What is Reverse NAT?
Example 1: By Shane
Let me give an example. I am setting up a web server on my home computer for my family to connect to. I get the server software set up and get the port forwarding rules all done. I test the port forwarding rule and the port is open and working through the router. I can log into my new server by its local IP on the computer. But when I try to connect to it by my internet IP address it fails. So I think, well if I can't connect by my internet IP neither can my family!
But this isn't true. What is happening is the router doesn't support reverse nat. The router doesn't like you trying to connect to yourself by the internet ip instead of the local ip. So now the user thinks the server isn't working when it really is.

Another quick example is instead of a web server the user is setup up security cameras to view remotely.
--------------------------------------------------------------------------------------------

Example 2: Submitted by Sylv
Reverse NAT is a phenomenon that you use your public/internet IP address to connect to yourself.
When you usually want to connect to your own network, from your own network, lets say you have a webserver hosted on your local PC and
you also maintain it from the same machine, you usually use your local IP right ? Yes, but lets say that you have a bit more complicated setup and
your server uses several databases to store data on or the other example: you have security video cameras set up that you want to watch remotely but maintain locally.
In such cases you cannot always go and use one IP for all connections by default.
There are situations when you need to setup some connection to handle different IP-s and in some cases this setup is crucial if you want other people
from outside your LAN to get access to your server. Now lets say you have everything set up, ports forwarded, accounts created and everything seems ready-to-go.
It works fine until you try to make a connection yourself, from your local machine, to your own server and you fail, although it works for everyone else. Sound weird doesn't it?
Well this can occur exactly when connections are made to your server using your internet IP. That means you try to connect to yourself using your public IP. = reverse nat. It's just like putting your internet IP to your internet browser address bar and trying to connect.

For some of us it works fine, for others, it can't resolve host. So why is that?
The answer is that those who can connect to themselves using their public IP, have routers that support reverse NAT.
But there are plenty of routers that don't. And that's when you run into a problem.
That's when you need to redirect your connection to your lan IP or upgrade your hardware.
--------------------------------------------------------------------------------------------

OK, so this makes sense, but how does a user know if their router supports reverse nat?
That will be the point of this guide. By the user knowing if their router supports reverse nat will help keep them from thinking their server isn't working when it is.

Now testing is fairly simple, but if you have never done it before can be a little confusing. So I will walk you through in 4 steps. :-)
Let's get started.

Step 1.
First thing we are going to do is use a computer for the test. So on your system we need to setup a port forwarding rule. It can be any port, choose a port currently not being used. For the sake of this guide I am using port 1979.
My site here has tons of info on setting up a port forwarding rules so I won't repeat that info here.

Step 2.
Download and install my Simple Internet Tools (It is free)
Once you have it installed open "Simple Internet Tools - Port Listener" from the star menu.

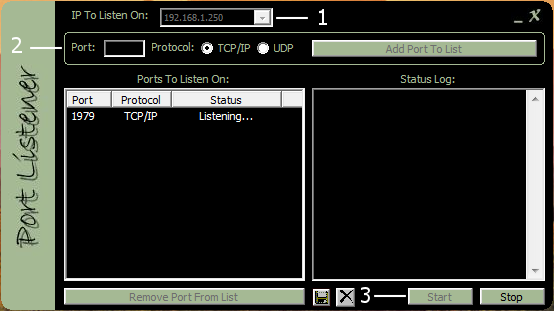
1. Make sure to choose your current local ip on your computer. Some users have more than one network, so choosing the right one is important!!
2. Put the port you put in the port forwarding rule. For this guide I did 1979, then click "Add Port To List"
3. Click "Start".

The program is now listening for connections on that port.

Step 3.
Lets first test that the port forwarding is working. Make sure the program is running and started from step 2. and then load my port tester page http://www.pcwintech.com/port_test.php
Then on that page put in the port and click "Check Port"

After you do that you should see it pass

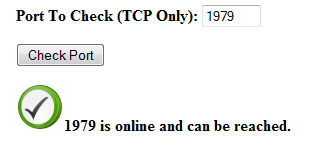
If it failed then you need to make sure your port forwarding rule is setup correctly.

Also if it passed you will see the program in step 2 shows that a connection was made


Step 4.
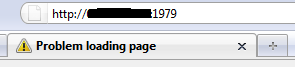
Now the final step, and only if step 3 passed. Open your web browser.
Copy your internet IP from my port tester page. and put it in the address bar like this http://xx.xx.xx.xx:1979
where the xx's is your IP. You will see at the end you then put a colon : and the port

Then hit enter. Now of course it will say page can not be displayed, which is fine and is what it should say! What we did was made a connection attempt via reverse nat.

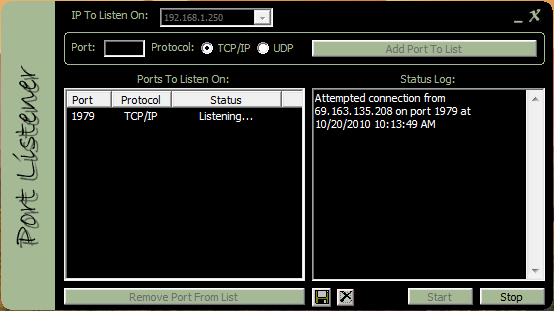
So if your router supports reverse nat then you should see the connection attempt in the program log window. If you see nothing then it failed and your router doesn't support reverse nat.

Hope this helps, need anything else just drop a post in the forums.

Take care!
Shane


Screenshots - Actiontec - GT724WG (Actiontec Firmware)

Actiontec - GT724WG (Actiontec Firmware)
  
Screenshot Database

Some screenshots have small distortions that were used to blur out personal info such as IP addresses and usernames.
(Click on a picture to view its full size.)


Home

Quick Setup

Quick Setup - Admin User Name & Password

Wireless Setup - Basic Settings

Utilities - Upgrade Firmware

Utilities - Web Activity Log

Wireless Setup - Advanced Settings

Utilities - System Log

Utilities - OAM Ping Test

Utilities - Ping Test

Wireless Setup - Wireless Status

Wireless Setup - Reboot

Advanced Setup

Advanced Setup - DSL Settings

Advanced Setup - DHCP Settings

Advanced Setup - LAN IP Address

Advanced Setup - WAN IP Address

Advanced Setup - QoS Upstream Settings

Advanced Setup - QoS Downstream Settings

Advanced Setup - QoS Status

Advanced Setup - Remote Management

Advanced Setup - Telnet Timeout Setting

Advanced Setup - Dynamic Routing

Advanced Setup - Static Routing

Advanced Setup - UPnP

Advanced Setup - Time Zone

Advanced Setup - Remote Syslog Capture

My Network - Network Status

Security

Security - Admin User Name and Password

Security - Firewall Settings

Security - Port Forwarding

Security - DMZ Hosting

Security - NAT

Internet Access Control

Internet Access Control - Services Blocking

Internet Access Control - Website Blocking

Internet Access Blocking - Schedule Rules

Utilities

Utilities - Restore Default Settings


Pages

Subscribe to PcWinTech.com™ RSS