Port Forwarding - Linksys - WRT160N v2 (Linksys Firmware)

Linksys - WRT160N v2 (Linksys Firmware)


Port Forwarding Guide
For automatic port forwarding try Simple Port Forwarding

Step 1.

Some routers & modems work best with port forwarding if you have a static local IP.
Manually set your network interface card ( NIC ) to use a static ip address.
You can also download my FREE Simple Static IP tool to set it for you.

Step 2.

Open your favorite web browser and input your routers ip address in the address bar.
Please note that you must have the http:// in order to connect to your router/modem properly.

Need help finding you router IP address? Click here

Step 3.

Some router/modems require a username and/or password, if yours requires it, enter the routers username and password here.

If you don't know it you can check our list of default router and modem password list here.

If you have changed it and don't remember it you may have to reset your device to factory default using the reset button on most routers.

Step 4.

Once logged into your router click on the "Applications & Gaming" tab.


Click To View Full Picture

Step 5.

Click 'Port Range Forwarding'

Under 'Application Name' Give your entry a name, it must not be the same as any others on this page.

In 'Start ~ End Port' enter the ports to be forwarded.
Example: 2100 to 2200 or 3000 to 3000

Next select the protocol for the ports.

In the 'IP Address' field put the local IP of the computer the ports will be forwarded to.

On 'Enable' make sure to check mark it.

Repeat this step for all ports.


Click To View Full Picture

Step 6.

Click 'Save Settings'

All done!


Screenshots - Linksys - WRT160N v2 (Linksys Firmware)

Linksys - WRT160N v2 (Linksys Firmware)


Screenshot Database

Some screenshots have small distortions that were used to blur out personal info such as IP addresses and usernames.
(Click on a picture to view its full size.)


Basic Setup

DDNS

Mac Address Clone

Advanced Routing

Basic Wireless Settings

Basic Wireless Settings - Manual

Wireless Security

Wireless MAC Filter

Advanced Wireless Settings

Firewall

VPN Passthrough

Internet Access Policy

Single Port Forwarding

Port Range
Forwarding

Port Range Triggering

DMZ

QoS

Management

Log

Diagnostics

Factory Default

Firmware Upgrade

Status - Router

Status - Local Network

Status - Wireless
   

Wireless Setup - MSI - RG60G (MSI Firmware)
MSI - RG60G (MSI Firmware)


Wireless Setup Guide

Note: When setting up or changing your wireless settings it is a good idea to be plugged into the router with your network cable and not your wireless connection.
          If you are using your wireless connection and make any changes you will lose you wireless connection.

Step 1.

Open your favorite web browser and input your routers ip address in the address bar.
Please note that you must have the http:// in order to connect to your router/modem properly.

Need help finding you router IP address? Click here

Step 2.

Some router/modems require a username and/or password, if yours requires it, enter the routers username and password here.

If you don't know it you can check our list of default router and modem password list here.

If you have changed it and don't remember it you may have to reset your device to factory default using the reset button on most routers.

Step 3.

Once logged into your router click on "Customized Configuration".
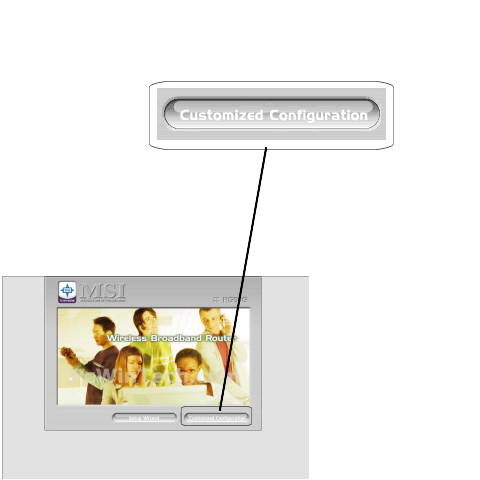

Click To View Full Picture

Step 4.

By default you should already be on the setup tab, if not click 'Setup'

Now click 'Wireless'
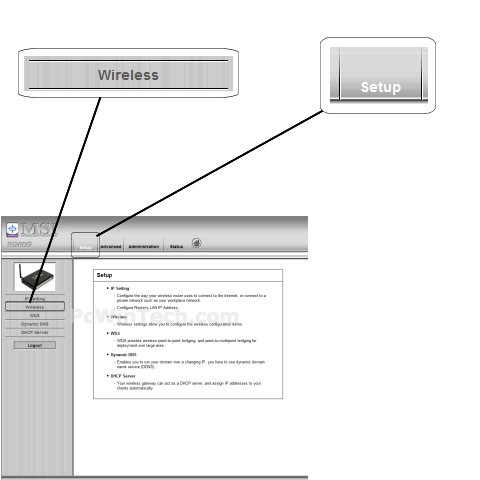

Click To View Full Picture

Step 5.

Put 'Wireless' to 'Enable'

For 'Network ID (SSID)' set a name you would like to call your wireless.
What you put here is what will show up when you are searching for a wireless connection.

For 'Channel' you can choose anything you like. If you have a 2.4 GHz cordless phone and it uses the same channel then your wireless connection will get dropped.

For 'Hide SSID Broadcast' & 'WMM' put both to 'Disable'

For 'Security Options' choose 'WPA-PSK/WPA2-PSK'

For 'Preshare Key Mode' choose 'ASCII'

For 'Preshare Key' put in a password of your liking, min 8 chars long.

Once all setting are set click 'Save'
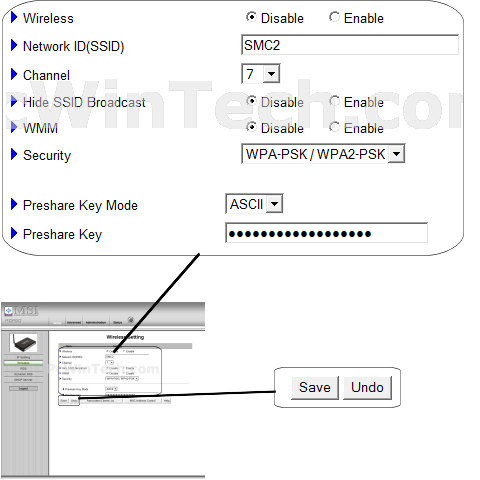

Click To View Full Picture

All done!


Wireless Setup - MSI Routers/Modems

If your router is not listed on this site or in the programs I can add them!
By adding your router I can create all the guides, screenshot databases and have your router work in my programs.
All you need to do is use my easy to use router screen capture program. This will make getting me the data easy and simple.
For more info click here.
Router Screen Capture


------------------------ Current Routers: ------------------------

Port Forwarding - MSI - RG60G (MSI Firmware)

MSI - RG60G (MSI Firmware)


Port Forwarding Guide
For automatic port forwarding try Simple Port Forwarding

Step 1.

Some routers & modems work best with port forwarding if you have a static local IP.
Manually set your network interface card ( NIC ) to use a static ip address.
You can also download my FREE Simple Static IP tool to set it for you.

Step 2.

Open your favorite web browser and input your routers ip address in the address bar.
Please note that you must have the http:// in order to connect to your router/modem properly.

Need help finding you router IP address? Click here

Step 3.

Some router/modems require a username and/or password, if yours requires it, enter the routers username and password here.

If you don't know it you can check our list of default router and modem password list here.

If you have changed it and don't remember it you may have to reset your device to factory default using the reset button on most routers.

Step 4.

Once logged into your router click on the "Customized Configuration".


Click To View Full Picture

Step 5.

Click 'Advanced'

Then once the new page is loaded click 'Virtual Server'


Click To View Full Picture

Step 6.

In the 'Server IP' field put the local IP of the computer the ports will be forwarded to.

In 'Public Port' enter the ports to be forwarded.
Example: 2100-2200 or 3000

Next select the protocol for the ports.

On 'Enable' make sure to check mark it.

Repeat this step for all ports.

Once all ports have been enter click 'Save'


Click To View Full Picture

All done!


Port Forwarding - MSI Routers/Modems

If your router is not listed on this site or in the programs I can add them!
By adding your router I can create all the guides, screenshot databases and have your router work in my programs.
All you need to do is use my easy to use router screen capture program. This will make getting me the data easy and simple.
For more info click here.
Router Screen Capture


------------------------ Current Routers: ------------------------

Screenshots - MSI Routers/Modems

If your router is not listed on this site or in the programs I can add them!
By adding your router I can create all the guides, screenshot databases and have your router work in my programs.
All you need to do is use my easy to use router screen capture program. This will make getting me the data easy and simple.
For more info click here.
Router Screen Capture


------------------------ Current Routers: ------------------------

Screenshots - MSI - RG60G (MSI Firmware)

MSI - RG60G (MSI Firmware)


Screenshot Database

Some screenshots have small distortions that were used to blur out personal info such as IP addresses and usernames.
(Click on a picture to view its full size.)


Main Screen

Setup Wizard - Step 1

Setup Wizard - Step 2

Setup Wizard - Step 3

Setup Wizard - Step 4

Setup

IP Setting

Wireless Setting

WDS Setting

Dynamic DNS

DHCP Server

Advanced

Basic Setting

MAC Address Clone

Outbound Packet Filtering

Domain Filtering

URL Filtering

Routing Table

Schedule Rule

Virtual Server

DMZ

Special Applications

Administration

Change Password

Firmware Upgrade

Backup Setting

System Time

Remote Access

Network Wakeup

Diagnostics

Status

System Status

System Log

Log Notification

SNMP Setting
 

Port Forwarding - Netgear - RP614 v2 (Netgear Firmware)

Netgear - RP614 v2 (Netgear Firmware)


Port Forwarding Guide
For automatic port forwarding try Simple Port Forwarding

Step 1.

Some routers & modems work best with port forwarding if you have a static local IP.
Manually set your network interface card ( NIC ) to use a static ip address.
You can also download my FREE Simple Static IP tool to set it for you.

Step 2.

Open your favorite web browser and input your routers ip address in the address bar.
Please note that you must have the http:// in order to connect to your router/modem properly.

Need help finding you router IP address? Click here

Step 3.

Some router/modems require a username and/or password, if yours requires it, enter the routers username and password here.

If you don't know it you can check our list of default router and modem password list here.

If you have changed it and don't remember it you may have to reset your device to factory default using the reset button on most routers.

Step 4.

Once logged into your router click on "Port Forwarding"


Click To View Full Picture

Step 5.

Now click on 'Add Custom Service'


Click To View Full Picture

Step 6.

Click and check 'Enable'

For 'Service Name' give this entry a name, this must be unique from any other entries.

In the 'Starting Port' & 'Ending Port' enter the ports to be forwarded.
Example: 2100 to 2200 or 3000 to 3000

In the 'Server IP Address' field put the local IP of the computer the ports will be forwarded to.

Click 'Add'

Repeat this step for all ports.


Click To View Full Picture

All done!


Screenshots - Netgear - RP614 v2 (Netgear Firmware)

Netgear - RP614 v2 (Netgear Firmware)


Screenshot Database

Some screenshots have small distortions that were used to blur out personal info such as IP addresses and usernames.
(Click on a picture to view its full size.)


Basic Settings

Logs

Block Sites

Block Services

Block Services - Add

Schedule

Email

Router Status

Attached Devices

Backup Settings

Set Password

Router Upgrade

Port Forwarding

Port Forwarding - Add

WAN Setup

LAN IP Setup

Dynamic DNS

Static Routes

Static Routes - Add

Remote Managment

UPnP

Pages

Subscribe to PcWinTech.com™ RSS