Auto Defrag & Shutdown

This is a little bat file I made that I use quite a bit on my systems and on customers.

The bat file defrags the C: drive and once it is done then shuts down the system. For some customers I have this scheduled in the windows task scheduler to run at midnight.
They leave their systems on when they leave the office, the system backs up and then at midnight it defrags and shuts down.

Why would you need this? Well besides from the example above here is why I use it. I'm about to head to bed, its late, and so I double click on the bat file, turn off my monitor and go to bed.
My computer will now be defragging and then power off (I turn my system off when I don't use it) So now I don't have to sit and wait for the defrag and it happens while I sleep.

Anyways I thought I would put this little file out for people who could use it and for the geek out there looking for a way of doing something similar and they can use this as an example.

The bat file looks like so:

ECHO PERFORMING DEFRAG...
start /wait %systemroot%\system32\defrag.exe C:

start %systemroot%\system32\SHUTDOWN.exe -s -f -t 30

EXIT


As you can see simple as can be. Enjoy!

-Shane

Screenshots - Netgear - DG834 V3 (Netgear Firmware)

Netgear - DG834 V3 (Netgear Firmware)


Screenshot Database

Some screenshots have small distortions that were used to blur out personal info such as IP addresses and usernames.
(Click on a picture to view its full size.)


Basic Settings

ADSL Settings

Logs

Block Sites

Firewall Rules

Services

Schedule

Email

Router Status

Attached Devices

Backup Settings

Set Password

Diagnostic

Firmware Upgrade

WAN Setup

Dynamic DNS

LAN IP Setup

Remote Management

Static Routes

UPnP

VPN Wizard

VPN Policies

VPN Status/Log

Outbound Services

Firewall Rules

Inbound Services
 

Port Forwarding - Actiontec - GT701 (Qwest Firmware)

Actiontec - GT701 (Qwest Firmware)


Port Forwarding Guide
For automatic port forwarding try Simple Port Forwarding

Step 1.

Some routers & modems work best with port forwarding if you have a static local IP.
Manually set your network interface card ( NIC ) to use a static ip address.
You can also download my FREE Simple Static IP tool to set it for you.

Step 2.

Open your favorite web browser and input your routers ip address in the address bar.
Please note that you must have the http:// in order to connect to your router/modem properly.

Need help finding you router IP address? Click here

Step 3.

Some router/modems require a username and/or password, if yours requires it, enter the routers username and password here.

If you don't know it you can check our list of default router and modem password list here.

If you have changed it and don't remember it you may have to reset your device to factory default using the reset button on most routers.

Step 4.

Once logged into your router click on the "Advanced Setup" tab on the top right.


Click To View Full Picture

Step 5.

Click on " Advanced Port Forwarding" along the left hand bottom side menu.


Click To View Full Picture

Step 6.

In the 'IP Port Range' enter the ports to be forwarded.
Example: 2100 to 2200 or 3000 to 3000

Next select the protocol for the ports.

In the 'IP Address' field put the local IP of the computer the ports will be forwarded to.

Click 'Add'

Repeat this step for all ports.


Click To View Full Picture

Step 7.

Once finished click the 'Apply' button.

All done!


Screenshots - Actiontec - GT701 (Qwest Firmware)

Port Triggering - Linksys - BEFSR41 (Linksys Firmware)

Linksys - BEFSR41 (Linksys Firmware)


Port Triggering Guide

Note: An added benefit of Port Triggering is you do not need to worry about ip addresses.

When using port triggering with applications that don't make outbound connections you can use my free
Port Triggering Initiator to make the connections to trigger the ports for you.

Step 1.

Open your favorite web browser and input your routers ip address in the address bar.
Please note that you must have the http:// in order to connect to your router/modem properly.

Need help finding you router IP address? Click here

Step 2.

Some router/modems require a username and/or password, if yours requires it, enter the routers username and password here.

If you don't know it you can check our list of default router and modem password list here.

If you have changed it and don't remember it you may have to reset your device to factory default using the reset button on most routers.

Step 3.

Once logged into your router click on the "Applications & Gaming" tab.


Click To View Full Picture

Step 4.

Click 'Port Triggering'

Under 'Application' Give your entry a name, it must not be the same as any others on this page.

Under 'Triggered Range' this will be what ports are used to trigger when to open the ports.
In 'Start Port' & 'End Port' enter the trigger ports
Example: 2100 to 2200 or 3000 to 3000

Under 'Forwarded Range' this will be what ports are to be forwarded.
In 'Start Port' & 'End Port' enter the ports
Example: 2100 to 2200 or 3000 to 3000

On 'Enable' make sure to check mark it.

Repeat this step for all ports.


Click To View Full Picture

Step 5.

Click 'Save Settings'

All done!


Port Forwarding - Linksys - BEFSR41 (Linksys Firmware)

Linksys - BEFSR41 (Linksys Firmware)


Port Forwarding Guide
For automatic port forwarding try Simple Port Forwarding

Step 1.

Some routers & modems work best with port forwarding if you have a static local IP.
Manually set your network interface card ( NIC ) to use a static ip address.
You can also download my FREE Simple Static IP tool to set it for you.

Step 2.

Open your favorite web browser and input your routers ip address in the address bar.
Please note that you must have the http:// in order to connect to your router/modem properly.

Need help finding you router IP address? Click here

Step 3.

Some router/modems require a username and/or password, if yours requires it, enter the routers username and password here.

If you don't know it you can check our list of default router and modem password list here.

If you have changed it and don't remember it you may have to reset your device to factory default using the reset button on most routers.

Step 4.

Once logged into your router click on the "Applications & Gaming" tab.


Click To View Full Picture

Step 5.

Normally 'Port Range Forward' is chosen by default, if not click it.

Under 'Application' Give your entry a name, it must not be the same as any others on this page.

In 'Start' & 'End' enter the ports to be forwarded.
Example: 2100 to 2200 or 3000 to 3000

Next select the protocol for the ports.

In the 'IP Address' field put the local IP of the computer the ports will be forwarded to.

On 'Enable' make sure to check mark it.

Repeat this step for all ports.


Click To View Full Picture

Step 6.

Click 'Save Settings'

All done!


Screenshots - Linksys - BEFSR41 (Linksys Firmware)

Linksys - BEFSR41 (Linksys Firmware)


Screenshot Database

Some screenshots have small distortions that were used to blur out personal info such as IP addresses and usernames.
(Click on a picture to view its full size.)


Basic Setup

DDNS

Mac Address Clone

Advanced Routing

Filter

VPN Passthrough

Port Forwarding

Port Triggering

UPnP Forwarding

DMZ

QoS

Management

Log

Factory Defaults

Firmware Upgrade

Status - Router

Status - Local Network
 

Wireless Setup - Tomato Firmware v1.21 (Tomato Firmware)

Tomato Firmware v1.21 (Tomato Firmware)
Website: http://www.polarcloud.com/tomato


Wireless Setup Guide

Note: When setting up or changing your wireless settings it is a good idea to be plugged into the router with your network cable and not your wireless connection.
          If you are using your wireless connection and make any changes you will lose you wireless connection.

Step 1.

Open your favorite web browser and input your routers ip address in the address bar.
Please note that you must have the http:// in order to connect to your router/modem properly.

Need help finding you router IP address? Click here

Step 2.

Some router/modems require a username and/or password, if yours requires it, enter the routers username and password here.

If you don't know it you can check our list of default router and modem password list here.

If you have changed it and don't remember it you may have to reset your device to factory default using the reset button on most routers.

Step 3.

Once logged into your router click on "Basic".
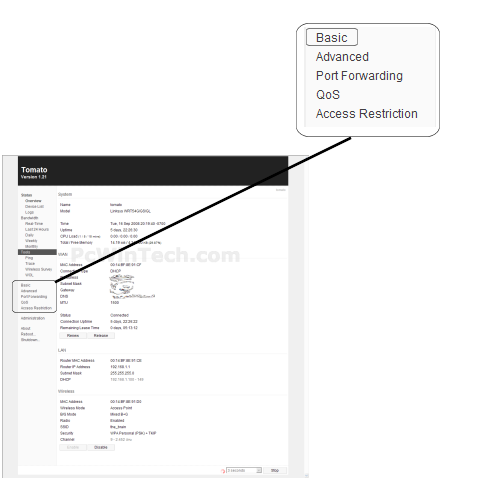

Click To View Full Picture

Step 4.

Under 'Basic' Click 'Network'

Put a check mark on 'Enable Wireless'

For 'Wireless Mode' choose 'Access Point'

For 'B/G Mode/ choose 'Mixed'

For 'SSID' set a name you would like to call your wireless.
What you put here is what will show up when you are searching for a wireless connection.

Put a check mark on 'Broadcast'

For 'Channel' you can choose anything you like. If you have a 2.4 GHz cordless phone and it uses the same channel then your wireless connection will get dropped.

For 'Security ' choose 'WPA Personal'

For 'Encryption' choose 'TKIP'

For 'Shared Key' put in a password of your liking, min 8 chars long.

Once all setting are set click 'Save'
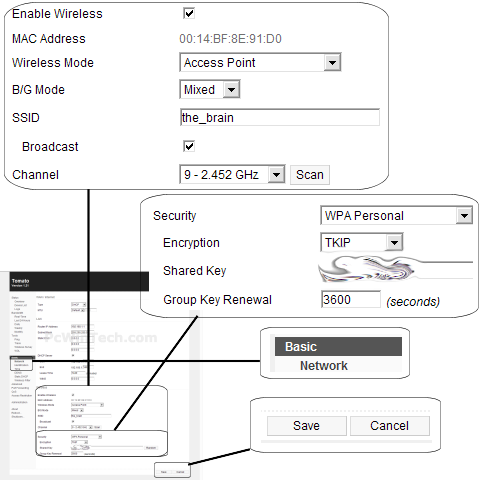

Click To View Full Picture

All done!


Port Triggering - Tomato Firmware v1.21 (Tomato Firmware)

Tomato Firmware v1.21 (Tomato Firmware)
Website: http://www.polarcloud.com/tomato


Port Triggering Guide

Note: An added benefit of Port Triggering is you do not need to worry about ip addresses.

When using port triggering with applications that don't make outbound connections you can use my free
Port Triggering Initiator to make the connections to trigger the ports for you.

Step 1.

Open your favorite web browser and input your routers ip address in the address bar.
Please note that you must have the http:// in order to connect to your router/modem properly.

Need help finding you router IP address? Click here

Step 2.

Some router/modems require a username and/or password, if yours requires it, enter the routers username and password here.

If you don't know it you can check our list of default router and modem password list here.

If you have changed it and don't remember it you may have to reset your device to factory default using the reset button on most routers.

Step 3.

Once logged into your router click on "Port Forwarding"


Click To View Full Picture

Step 4.

Under 'Port Forwarding' choose 'Triggered'

Put a check mar on 'On'

Under 'Proto' choose which protocol to use.

In the 'Trigger Ports' enter the ports to be used as the trigger.
Example: 2100 or 3000-3001

In the 'Forwarded Ports' enter the ports to be forwarded.
Example: 2100 or 3000-3001

Under 'Description' give your entry a name.

Click 'Add'

Repeat this step for all ports.


Click To View Full Picture

Step 5.

Click 'Save'

All done!


Port Forwarding - Tomato Firmware v1.21 (Tomato Firmware)

Tomato Firmware v1.21 (Tomato Firmware)
Website: http://www.polarcloud.com/tomato


Port Forwarding Guide
For automatic port forwarding try Simple Port Forwarding

Step 1.

Some routers & modems work best with port forwarding if you have a static local IP.
Manually set your network interface card ( NIC ) to use a static ip address.
You can also download my FREE Simple Static IP tool to set it for you.

Step 2.

Open your favorite web browser and input your routers ip address in the address bar.
Please note that you must have the http:// in order to connect to your router/modem properly.

Need help finding you router IP address? Click here

Step 3.

Some router/modems require a username and/or password, if yours requires it, enter the routers username and password here.

If you don't know it you can check our list of default router and modem password list here.

If you have changed it and don't remember it you may have to reset your device to factory default using the reset button on most routers.

Step 4.

Once logged into your router click on "Port Forwarding"


Click To View Full Picture

Step 5.

Under 'Port Forwarding' choose 'Basic'

Put a check mar on 'On'

Under 'Proto' choose which protocol to use.

Leave 'Src Address' blank

In the 'Ext Ports' enter the ports to be forwarded.
Example: 2100 or 3000-3001 or 2100,3000

Leave 'Int Port' blank

In the 'Int Address' field put the local IP of the computer the ports will be forwarded to.

Under 'Description' give your entry a name.

Click 'Add'

Repeat this step for all ports.


Click To View Full Picture

Step 6.

Once all ports have been entered click 'Save'

All done!


Pages

Subscribe to PcWinTech.com™ RSS