Port Triggering - Linksys - WRTP54G (Linksys Firmware)

Linksys - WRTP54G (Linksys Firmware)


Port Triggering Guide

Note: An added benefit of Port Triggering is you do not need to worry about ip addresses.

When using port triggering with applications that don't make outbound connections you can use my free
Port Triggering Initiator to make the connections to trigger the ports for you.

Step 1.

Open your favorite web browser and input your routers ip address in the address bar.
Please note that you must have the http:// in order to connect to your router/modem properly.

Need help finding you router IP address? Click here

Step 2.

Put in your username and password, then click 'Log In'


Click To View Full Picture

If you don't know it you can check our list of default router and modem password list here.

If you have changed it and don't remember it you may have to reset your device to factory default using the reset button on most routers.

Step 3.

Once logged into your router click on the "Applications & Gaming" tab.


Click To View Full Picture

Step 4.

Click 'Port Triggering'

Under 'Application' Give your entry a name, it must not be the same as any others on this page.

Under 'Triggered Range' this will be what ports are used to trigger when to open the ports.
In 'Start Port' & 'End Port' enter the trigger ports
Example: 2100 to 2200 or 3000 to 3000

Under 'Forwarded Range' this will be what ports are to be forwarded.
In 'Start Port' & 'End Port' enter the ports
Example: 2100 to 2200 or 3000 to 3000

On 'Enable' make sure to check mark it.

Repeat this step for all ports.


Click To View Full Picture

Step 5.

Click 'Save Settings'

All done!


Port Forwarding - Linksys - WRTP54G (Linksys Firmware)

Linksys - WRTP54G (Linksys Firmware)


Port Forwarding Guide
For automatic port forwarding try Simple Port Forwarding

Step 1.

Some routers & modems work best with port forwarding if you have a static local IP.
Manually set your network interface card ( NIC ) to use a static ip address.
You can also download my FREE Simple Static IP tool to set it for you.

Step 2.

Open your favorite web browser and input your routers ip address in the address bar.
Please note that you must have the http:// in order to connect to your router/modem properly.

Need help finding you router IP address? Click here

Step 3.

Put in your username and password, then click 'Log In'


Click To View Full Picture

If you don't know it you can check our list of default router and modem password list here.

If you have changed it and don't remember it you may have to reset your device to factory default using the reset button on most routers.

Step 4.

Once logged into your router click on the "Applications & Gaming" tab.


Click To View Full Picture

Step 5.

Click 'Port Range Forwarding'

Under 'Application Name' Give your entry a name, it must not be the same as any others on this page.

In 'Start ~ End Port' enter the ports to be forwarded.
Example: 2100 to 2200 or 3000 to 3000

Next select the protocol for the ports.

In the 'IP Address' field put the local IP of the computer the ports will be forwarded to.

On 'Enable' make sure to check mark it.

Repeat this step for all ports.


Click To View Full Picture

Step 6.

Click 'Save Settings'

All done!


Screenshots - Linksys - WRTP54G (Linksys Firmware)

Linksys - WRTP54G (Linksys Firmware)


Screenshot Database

Some screenshots have small distortions that were used to blur out personal info such as IP addresses and usernames.
(Click on a picture to view its full size.)


Login

Basic Setup

DDNS

MAC Address Clone

Advanced Routing

Basic Wireless Settings

Wireless Security

Wireless MAC Filter

Advanced Wireless Settings

Firewall

VPN Passthrough

Filter

Port Forwarding

Port Triggering

DMZ

Management

Log

Factory Defaults

Diagnostics

Router Status

Status - Local Network

Status - Wireless

Status -Voice

Voice

Port Forwarding - Actiontec - R1520SU (Qwest Firmware)

Actiontec - R1520SU (Qwest Firmware)


Port Forwarding Guide
For automatic port forwarding try Simple Port Forwarding

Step 1.

Some routers & modems work best with port forwarding if you have a static local IP.
Manually set your network interface card ( NIC ) to use a static ip address.
You can also download my FREE Simple Static IP tool to set it for you.

Step 2.

Open your favorite web browser and input your routers ip address in the address bar.
Please note that you must have the http:// in order to connect to your router/modem properly.

Need help finding you router IP address? Click here

Step 3.

Some router/modems require a username and/or password, if yours requires it, enter the routers username and password here.

If you don't know it you can check our list of default router and modem password list here.

If you have changed it and don't remember it you may have to reset your device to factory default using the reset button on most routers.

Step 4.

Once logged into your router click on the "Setup / Configuration".


Click To View Full Picture

Step 5.

Click on "Advanced Setup"

Then on the following page click 'Begin Advanced Setup'


Click To View Full Picture

Step 6.

In the 'IP Port Range' enter the ports to be forwarded.
Example: 2100 to 2200 or 3000 to 3000

For 'Protocol' select the protocol for the ports.

In the 'IP Address' field put the local IP of the computer the ports will be forwarded to.

Click 'Add'

Repeat this step for all ports.


Click To View Full Picture

Step 7.

Once finished click the 'Save and Restart' button.

All done!


Screenshots - Actiontec - R1520SU (Qwest Firmware)

Actiontec - R1520SU (Qwest Firmware)


Screenshot Database

Some screenshots have small distortions that were used to blur out personal info such as IP addresses and usernames.
(Click on a picture to view its full size.)


Main Menu

Set up / Configuration

Change Admin Password

Basic Setup

Broadband Connection

PPP

Save and Restart

Advanced Setup

Advanced Setup - Main

WAN IP Address

Broadband via PPPoE/PPPoA

Wireless Settings

LAN IP Address

DHCP Server

DHCP Server Config

Services Blocking

Website Blocking

VPN Passthrough

Remote Management

Port Forwarding

DMZ Hosting

MAC Address Cloning

NAT

Static Routing

Save and Restart

DSL Modem Setup Page

Current Status

Utilities

Web Activity Log

DSL Settings

Upgrade Firmware
   

Must have tool for my fellow techs

One of the most useful tools I use when fixing customers computers is Unlocker

What this tool does is allow you to rename, delete, move and unlock files that are in use.
What's the big deal about this? Well besides those annoying times when your trying to delete a folder and explorer has it locked for no reason this comes in handy.

But the most useful reason, and the main reason I use it so much is being able to clean up spyware that has infected a system.

When a customer calls me and I need to clean their system sometimes spybot search and destroy doesn't cut it or any other tool. When spyware becomes blocked the spyware makers make a new one, its a tug of war that will never end. So sometimes I have to clean the spyware out manually. Its not to hard sometimes to track down the infected files, but when I find them a lot of the times they are hooked to explorer.exe or another system file and instead of trying to kill explorer and delete by a command prompt I just right click on the file, choose unlocker and delete it!

So for my fellow techs out there, this tool is a must have.

-Shane

Find Your Router IP Address

Finding your routers local IP address under normal circumstances is easy and straight forward.

In these 3 quick steps I will show you how to get your routers local IP.

Step 1.

Open the run command, this is normally under your start menu, if it isn't hold down the 'Windows' key on your keyboard and hit 'r'

Inside the run command type cmd and hit ok

Step 2.

Once inside the command window type in ipconfig and hit enter.

Step 3.

Your local network info will show up, normally your gateway is your router. So the gateway IP is your router IP.

All done!


Port Triggering - Westell - B90-327W15-06 (Westell Firmware)
Westell - B90-327W15-06 (Westell Firmware)


Port Triggering Guide

Note: An added benefit of Port Triggering is you do not need to worry about ip addresses.

When using port triggering with applications that don't make outbound connections you can use my free
Port Triggering Initiator to make the connections to trigger the ports for you.

Step 1.

Open your favorite web browser and input your routers ip address in the address bar.
Please note that you must have the http:// in order to connect to your router/modem properly.

Need help finding you router IP address? Click here

Step 2.

Some router/modems require a username and/or password, if yours requires it, enter the routers username and password here.

If you don't know it you can check our list of default router and modem password list here.

If you have changed it and don't remember it you may have to reset your device to factory default using the reset button on most routers.

Step 3.

Once logged into your router click on "Configuration" then 'Services'


Click To View Full Picture

Step 4.

Now click on 'Define Custom Service'


Click To View Full Picture

Step 5.

Choose 'Trigger Ports' and click 'Next'


Click To View Full Picture

Step 6.

For 'Service Name' give this entry a name, this must be unique from any other entries.

In the 'Local 'Trigger' Port Range' enter the ports to be used as the trigger.
Example: 2100 to 2200 or 3000 to 3000

In the 'Global Port Range' enter the ports to be forwarded.
Example: 2100 to 2200 or 3000 to 3000

Click 'Next'
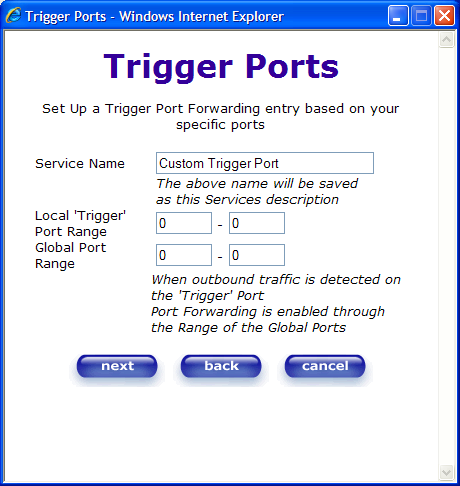

Click To View Full Picture

Step 7.

This screen will show you the ports you have added.

To add more ports click 'Add'

Repeat this steps 6 & 7 for all ports.

Once done adding ports close the pop up window.
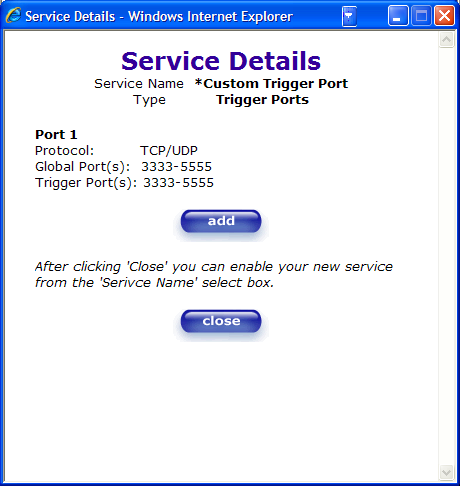

Click To View Full Picture

Step 8.

Once you have added all the ports you need choose the entry you made from the drop down list 'Service Name'

Then click 'Enable'
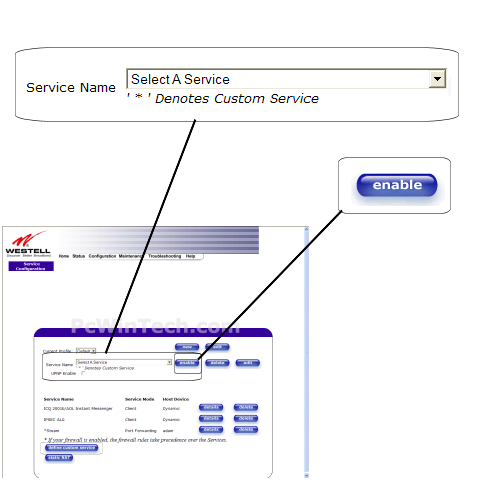

Click To View Full Picture

All done!

Port Triggering - Westell Routers/Modems

If your router is not listed on this site or in the programs I can add them!
By adding your router I can create all the guides, screenshot databases and have your router work in my programs.
All you need to do is use my easy to use router screen capture program. This will make getting me the data easy and simple.
For more info click here.
Router Screen Capture


------------------------ Current Routers: ------------------------

Port Forwarding - Westell - B90-327W15-06 (Westell Firmware)

Westell - B90-327W15-06 (Westell Firmware)


Port Forwarding Guide
For automatic port forwarding try Simple Port Forwarding

Step 1.

Some routers & modems work best with port forwarding if you have a static local IP.
Manually set your network interface card ( NIC ) to use a static ip address.
You can also download my FREE Simple Static IP tool to set it for you.

Step 2.

Open your favorite web browser and input your routers ip address in the address bar.
Please note that you must have the http:// in order to connect to your router/modem properly.

Need help finding you router IP address? Click here

Step 3.

Some router/modems require a username and/or password, if yours requires it, enter the routers username and password here.

If you don't know it you can check our list of default router and modem password list here.

If you have changed it and don't remember it you may have to reset your device to factory default using the reset button on most routers.

Step 4.

Once logged into your router click on "Configuration" then 'Services'


Click To View Full Picture

Step 5.

Now click on 'Define Custom Service'


Click To View Full Picture

Step 6.

Choose 'Port Forwarding Ranges of Ports' and click 'Next'


Click To View Full Picture

Step 7.

For 'Service Name' give this entry a name, this must be unique from any other entries.

In the 'Global Port Range' enter the ports to be forwarded.
Example: 2100 to 2200 or 3000 to 3000

For 'Base Host Port' enter the first port from 'Global Port Range'

For 'Protocol' choose 'TCP' or 'UDP'

Click 'Next'


Click To View Full Picture

Step 8.

This screen will show you the ports you have added.

To add more ports click 'Add'

Repeat this steps 7 & 8 for all ports.

Once done adding ports close the pop up window.


Click To View Full Picture

Step 9.

Once you have added all the ports you need choose the entry you made from the drop down list 'Service Name'

Then click 'Enable'


Click To View Full Picture

All done!


Pages

Subscribe to PcWinTech.com™ RSS