Screenshots - Tomato Firmware v1.21 (Tomato Firmware)

Wireless Setup - Netgear - WGR614 v7 (Netgear Firmware)

Netgear - WGR614 v7 (Netgear Firmware)


Wireless Setup Guide

Note: When setting up or changing your wireless settings it is a good idea to be plugged into the router with your network cable and not your wireless connection.
          If you are using your wireless connection and make any changes you will lose you wireless connection.

Step 1.

Open your favorite web browser and input your routers ip address in the address bar.
Please note that you must have the http:// in order to connect to your router/modem properly.

Need help finding you router IP address? Click here

Step 2.

Some router/modems require a username and/or password, if yours requires it, enter the routers username and password here.

If you don't know it you can check our list of default router and modem password list here.

If you have changed it and don't remember it you may have to reset your device to factory default using the reset button on most routers.

Step 3.

Once logged into your router click on "Wireless Settings".


Click To View Full Picture

Step 4.

For 'Name (SSID)' set a name you would like to call your wireless.
What you put here is what will show up when you are searching for a wireless connection.

For 'Channel' you can choose anything you like. If you have a 2.4 GHz cordless phone and it uses the same channel then your wireless connection will get dropped.

For 'Mode' choose 'g and b'.

For 'Security Options' choose 'WPA-PSK [TKIP] + WPA2-PSK [AES]

For 'Passphrase' put in a password of your liking, min 8 chars long.

Once all setting are set click 'Apply'


Click To View Full Picture

All done!


Port Triggering - Netgear - WGR614 v7 (Netgear Firmware)

Netgear - WGR614 v7 (Netgear Firmware)


Port Triggering Guide

Note: An added benefit of Port Triggering is you do not need to worry about ip addresses.

When using port triggering with applications that don't make outbound connections you can use my free
Port Triggering Initiator to make the connections to trigger the ports for you.

Step 1.

Open your favorite web browser and input your routers ip address in the address bar.
Please note that you must have the http:// in order to connect to your router/modem properly.

Need help finding you router IP address? Click here

Step 2.

Some router/modems require a username and/or password, if yours requires it, enter the routers username and password here.

If you don't know it you can check our list of default router and modem password list here.

If you have changed it and don't remember it you may have to reset your device to factory default using the reset button on most routers.

Step 3.

Once logged into your router click on "Port Forwarding / Port Triggering"


Click To View Full Picture

Step 4.

Under 'Please select the service type' choose 'Port Triggering'

Now click on 'Add Service'


Click To View Full Picture

Step 5.

For 'Service Name' give this entry a name, this must be unique from any other entries.

For 'Service User' choose 'Any'

Under 'Service Type' choose which protocol to use for the triggering port.

In the 'Triggering Port' enter the port to be used as the trigger.
Example: 2100

For 'Connection Type' choose the protocol to use for the ports to be forward when triggering in enabled.

In the 'Starting Port' & 'Ending Port' enter the ports to be forwarded when triggering in enabled.
Example: 2100 to 2200 or 3000 to 3000

Click 'Apply'

Repeat this step for all ports.


Click To View Full Picture

All done!


Port Forwarding - Netgear - WGR614 v7 (Netgear Firmware)

Netgear - WGR614 v7 (Netgear Firmware)


Port Forwarding Guide
For automatic port forwarding try Simple Port Forwarding

Step 1.

Some routers & modems work best with port forwarding if you have a static local IP.
Manually set your network interface card ( NIC ) to use a static ip address.
You can also download my FREE Simple Static IP tool to set it for you.

Step 2.

Open your favorite web browser and input your routers ip address in the address bar.
Please note that you must have the http:// in order to connect to your router/modem properly.

Need help finding you router IP address? Click here

Step 3.

Some router/modems require a username and/or password, if yours requires it, enter the routers username and password here.

If you don't know it you can check our list of default router and modem password list here.

If you have changed it and don't remember it you may have to reset your device to factory default using the reset button on most routers.

Step 4.

Once logged into your router click on "Port Forwarding / Port Triggering"


Click To View Full Picture

Step 5.

Under 'Please select the service type' choose 'Port Forwarding'

Now click on 'Add Custom Service'


Click To View Full Picture

Step 6.

For 'Service Name' give this entry a name, this must be unique from any other entries.

Under 'Service Type' choose which protocol to use.

In the 'Starting Port' & 'Ending Port' enter the ports to be forwarded.
Example: 2100 to 2200 or 3000 to 3000

In the 'Server IP Address' field put the local IP of the computer the ports will be forwarded to.

Click 'Apply'

Repeat this step for all ports.


Click To View Full Picture

All done!


Wireless Setup - Linksys - WRT54G (Linksys Firmware)
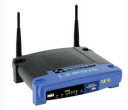
Linksys - WRT54G (Linksys Firmware)


Wireless Setup Guide

Note: When setting up or changing your wireless settings it is a good idea to be plugged into the router with your network cable and not your wireless connection.
          If you are using your wireless connection and make any changes you will lose you wireless connection.

Step 1.

Open your favorite web browser and input your routers ip address in the address bar.
Please note that you must have the http:// in order to connect to your router/modem properly.

Need help finding you router IP address? Click here

Step 2.

Some router/modems require a username and/or password, if yours requires it, enter the routers username and password here.

If you don't know it you can check our list of default router and modem password list here.

If you have changed it and don't remember it you may have to reset your device to factory default using the reset button on most routers.

Step 3.

Once logged into your router click on the "Wireless" tab.
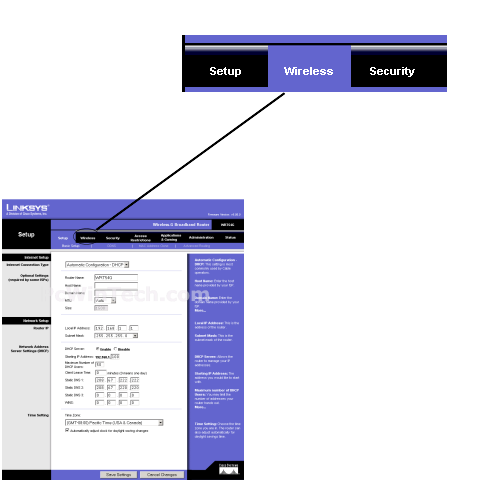

Click To View Full Picture

Step 4.

By default 'Basic Wireless Setting' should be chosen, if not click it now.

For 'Wireless Network Mode' set to enable.

For 'Wireless Network Name (SSID)' set a name you would like to call your wireless.
What you put here is what will show up when you are searching for a wireless connection.

For 'Wireless SSID Broadcast' normally you will have this set to enable.
This will broadcast your wireless connection to be detected by your wireless card.
This is a good way for a standard user to find the network, but also why it is important to have wireless security in place.

Once all information is set click on 'Save Settings'
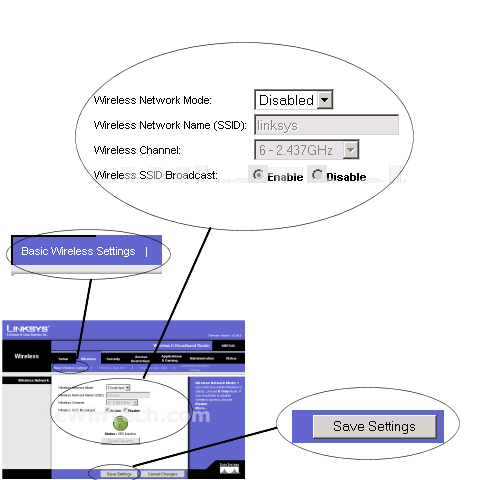

Click To View Full Picture

Step 5.

Now click on 'Wireless Security'

For 'Security Mode:' you will have multiple options, for the sake of keeping this guide simple I recommend you choose WPA.
WPA is widely supported by wireless cards and allows you to set your own password.

Once you have your security set more boxes will appear on screen.

For setting your wireless password you will enter it into the 'Passphrase' or 'Password' box.

Once you have your setting all set click 'Save Settings'
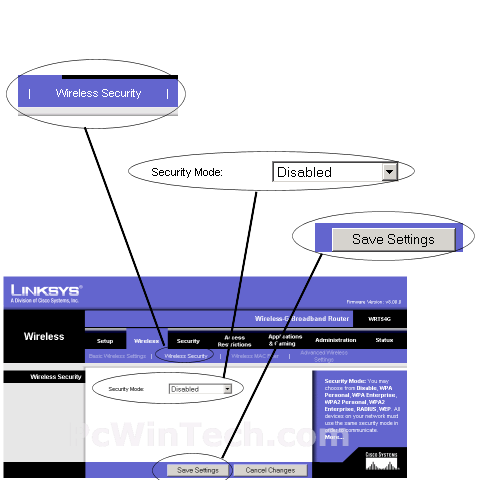

Click To View Full Picture

All done!


Port Triggering - Linksys - WRT54G (Linksys Firmware)

Linksys - WRT54G (Linksys Firmware)


Port Triggering Guide

Note: An added benefit of Port Triggering is you do not need to worry about ip addresses.

When using port triggering with applications that don't make outbound connections you can use my free
Port Triggering Initiator to make the connections to trigger the ports for you.

Step 1.

Open your favorite web browser and input your routers ip address in the address bar.
Please note that you must have the http:// in order to connect to your router/modem properly.

Need help finding you router IP address? Click here

Step 2.

Some router/modems require a username and/or password, if yours requires it, enter the routers username and password here.

If you don't know it you can check our list of default router and modem password list here.

If you have changed it and don't remember it you may have to reset your device to factory default using the reset button on most routers.

Step 3.

Once logged into your router click on the "Applications & Gaming" tab.


Click To View Full Picture

Step 4.

Click 'Port Triggering'

Under 'Application' Give your entry a name, it must not be the same as any others on this page.

Under 'Triggered Range' this will be what ports are used to trigger when to open the ports.
In 'Start Port' & 'End Port' enter the trigger ports
Example: 2100 to 2200 or 3000 to 3000

Under 'Forwarded Range' this will be what ports are to be forwarded.
In 'Start Port' & 'End Port' enter the ports
Example: 2100 to 2200 or 3000 to 3000

On 'Enable' make sure to check mark it.

Repeat this step for all ports.


Click To View Full Picture

Step 5.

Click 'Save Settings'

All done!


Products & Tools


(Please Note: If your anti virus says it found a virus of any kind please know this is a false alarm. You can use www.virustotal.com to also see what other antivirus software says.
There are no viruses in any of the programs on this site. If your anti virus says it has one please submit the file in question to your anti virus maker, they will then scan the file themselves, see the program or setup is clean and update there virus def's to not cause the false alarm.)


CleanMem
CleanMem keeps memory use in check on the system without the memory being pushed to the page file. This in turn keeps the system running smoother.


CS Fire Monitor
CS Fire Monitor is a comprehensive monitoring tool for the Windows 2000, XP, 2003, Vista & 2008 platforms. It has an extensive range of live monitoring screens that capture data from many areas within a PC and since the application has its own inbuilt database it is also capable of producing a number of reports which can be saved in a variety of ways. In addition, the Remote Viewer allows the user to access other PCs on the same LAN or over the Internet to extract key information. The application is highly configurable and incorporates several methods of monitoring the same information so that each user can choose the most appropriate method to meet their needs.


Drive Speedometer
Drive Speedometer is a program I made to help monitor the current read and writes speeds of you hard drives.


Port Triggering Initiator
When you use port triggering on your router a connection attempt must be made from your computer to an address on the trigger port. When you router detects the connection attempt your router then turns on the ports, thus you have port triggering, a on/off switch for port forwarding.
Well the problem comes if you are using port trigging for a program that doesn't make a connection attempt, such as say a ftp server or hosting a game. If a connection is never detected the router never enables the ports.
Well that's what Port Triggering Initiator is designed for. You enter the triggering port to make a connection on and give it a address outside your network. Any address will do even if the connection fails its the attempt that triggers the ports.


Router Screen Capture
Capture the WebPages of your router to submit to PcWinTech.com


Simple Internet Meter
Simple Internet Meter is my new bandwidth monitor. After my program CS Fire Monitor came out years ago I had many requests for added features. Many of those features where not possible to add using the Windows API. Such as seeing what is internet traffic and what is local network traffic. The only way to accomplish this is to look at the packet data. So I made this program using WinPcap and PacketX.dll.


Simple Internet Meter Lite
Simple Internet Meter is my new bandwidth monitor. After my program CS Fire Monitor came out years ago I had many requests for added features. Many of those features where not possible to add using the Windows API. Such as seeing what is internet traffic and what is local network traffic. The only way to accomplish this is to look at the packet data. So I made this program using WinPcap and PacketX.dll.


Simple Internet Tools
Simple internet tools is a dozen of simple yet helpful tools for both the common user and admin's.


Simple Ping
Simple Ping is a small program to help keep an eye on your current internet ping.
I made this program because I have a wireless internet provider. My ping times like to go all over the place. Well while playing a online game, I would lag every now and then. The game itself had no way to show me my ping. So I decided to make a program that could tell me :-)


Simple Port Forwarding
Simple Port Forwarding works with WebPages and not directly with your router. Making it a safe program to use. Its no different than using Firefox, IE or any other browser to setup port forwarding yourself.
The program works by automating the process for you. So whether you don't understand how to forward ports, or your simply looking for an easier way to forward ports then this program is for you.
Its port forwarding made simple.


Simple Port Tester
Simple Port Tester is a free program by PcWinTech.com to help users test if their ports are open with just a few clicks.


Simple Port Tester - Mac Edition
Simple Port Tester is a free program by PcWinTech.com to help users test if their ports are open with just a few clicks.


Simple Shutdown Timer
Program is pretty self explanatory. Put in the time and click start. When the time reaches 0 the computer will shut down and power off (if able to power off).


Simple Static IP
Simple Static IP is a free program by PcWinTech.com to help users set their IP address to static with just a few clicks.


Simple Webpage Capture
Simple Webpage Capture allows you to take a perfect picture of large WebPages. Site designers, people having trouble with a webpage, or just about anyone may have a need to take a screen shot of a webpage. But with many WebPages being large and rather long taking a screenshot of the whole page is a big task. But now this program makes it simple, with one click of a button the program will auto scroll the page combining the screenshots into one perfect picture. Making capturing a webpage simple.


Port Forwarding - Linksys - WRT54G (Linksys Firmware)

Linksys - WRT54G (Linksys Firmware)


Port Forwarding Guide
For automatic port forwarding try Simple Port Forwarding

Step 1.

Some routers & modems work best with port forwarding if you have a static local IP.
Manually set your network interface card ( NIC ) to use a static ip address.
You can also download my FREE Simple Static IP tool to set it for you.

Step 2.

Open your favorite web browser and input your routers ip address in the address bar.
Please note that you must have the http:// in order to connect to your router/modem properly.

Need help finding you router IP address? Click here

Step 3.

Some router/modems require a username and/or password, if yours requires it, enter the routers username and password here.

If you don't know it you can check our list of default router and modem password list here.

If you have changed it and don't remember it you may have to reset your device to factory default using the reset button on most routers.

Step 4.

Once logged into your router click on the "Applications & Gaming" tab.


Click To View Full Picture

Step 5.

Normally 'Port Range Forward' is chosen by default, if not click it.

Under 'Application' Give your entry a name, it must not be the same as any others on this page.

In 'Start' & 'End' enter the ports to be forwarded.
Example: 2100 to 2200 or 3000 to 3000

Next select the protocol for the ports.

In the 'IP Address' field put the local IP of the computer the ports will be forwarded to.

On 'Enable' make sure to check mark it.

Repeat this step for all ports.


Click To View Full Picture

Step 6.

Click 'Save Settings'

All done!


Basic Information

This page is meant to provide definitions and answers to what some of the common networking and internet terms are with routers & modems.

Instead of simply rewriting or copying the information from other pages I have provided direct links to Wikipedia pages with all the detailed information on what your looking for.

Makes for some good reading for us geeks :-)

Simply click on any term below and a new window will open and load the Wikipedia page for that term.


Internet Protocol - http://en.wikipedia.org/wiki/Internet_Protocol

IP Address - http://en.wikipedia.org/wiki/IP_address

Subnet - http://en.wikipedia.org/wiki/Subnetwork

Default Gateway - http://en.wikipedia.org/wiki/Default_gateway

DNS - http://en.wikipedia.org/wiki/Domain_name_system

DHCP - http://en.wikipedia.org/wiki/Dhcp

Local Area Network (LAN) - http://en.wikipedia.org/wiki/Local_area_network

Gigabit Ethernet - http://en.wikipedia.org/wiki/Gigabit_Ethernet

Wireless Lan - http://en.wikipedia.org/wiki/Wireless_LAN

Wi-Fi - http://en.wikipedia.org/wiki/Wi-Fi

Wireless Security - http://en.wikipedia.org/wiki/Wireless_security

Port Forwarding - http://en.wikipedia.org/wiki/Port_forwarding

Port Triggering - http://en.wikipedia.org/wiki/Port_triggering

TCP & UDP Ports - http://en.wikipedia.org/wiki/TCP_and_UDP_port

Routers - http://en.wikipedia.org/wiki/Router

Modem - http://en.wikipedia.org/wiki/Modem

Cable Modem - http://en.wikipedia.org/wiki/Cable_modem

DSL Modem - http://en.wikipedia.org/wiki/DSL_modem

Verizon FiOS - http://en.wikipedia.org/wiki/Verizon_FiOS

IP Multimedia Subsystem - http://en.wikipedia.org/wiki/IP_Multimedia_Subsystem

Port Forwarding - Actiontec - M1000 (Qwest Firmware)

Actiontec - M1000 (Qwest Firmware)


Port Forwarding Guide
For automatic port forwarding try Simple Port Forwarding

Step 1.

Some routers & modems work best with port forwarding if you have a static local IP.
Manually set your network interface card ( NIC ) to use a static ip address.
You can also download my FREE Simple Static IP tool to set it for you.

Step 2.

Open your favorite web browser and input your routers ip address in the address bar.
Please note that you must have the http:// in order to connect to your router/modem properly.

Need help finding you router IP address? Click here

Step 3.

Some router/modems require a username and/or password, if yours requires it, enter the routers username and password here.

If you don't know it you can check our list of default router and modem password list here.

If you have changed it and don't remember it you may have to reset your device to factory default using the reset button on most routers.

Step 4.

Once logged into your router click on the "Advanced Setup" tab on the top right.


Click To View Full Picture

Step 5.

Click on " Advanced Port Forwarding" along the left hand bottom side menu.


Click To View Full Picture

Step 6.

In the 'IP Port Range' enter the ports to be forwarded.
Example: 2100 to 2200 or 3000 to 3000

Next select the protocol for the ports.

In the 'IP Address' field put the local IP of the computer the ports will be forwarded to.

Click 'Add'

Repeat this step for all ports.


Click To View Full Picture

Step 7.

Once finished click the 'Apply' button.

All done!


Pages

Subscribe to PcWinTech.com™ RSS